
Selenium Training Guide
Selenium RC(Remote Control)
Introduction:
Selenium RC was the main Selenium project to get quite a long time, before the WebDriver/Selenium merge, as you may read in Brief Background of The Selenium Job brought up Selenium 2, the hottest and more powerful tool.
Selenium 1 is still actively supported (mainly in maintenance mode) and provides some features which will not be available in Selenium 2 for a while, including support for many languages (Java, Javascript, Ruby, PHP, Python, Perl and C#) and support for virtually every browser out there.
How Selenium RC Functions?
How Selenium RC Functions?
First, we will describe the way the components of Selenium RC work as well as the part each plays in running your test scripts.
RC Parts:
Selenium RC parts are:
- The Selenium Server which found and kills browsers, interprets and runs the Selenese commands passed in the evaluation program, and acts as an HTTP proxy, intercepting and verifying HTTP messages passed between the browser along with the AUT.
- Client libraries which provide the interface between the Selenium RC Server and each programming language.
This is a simplified design diagram....
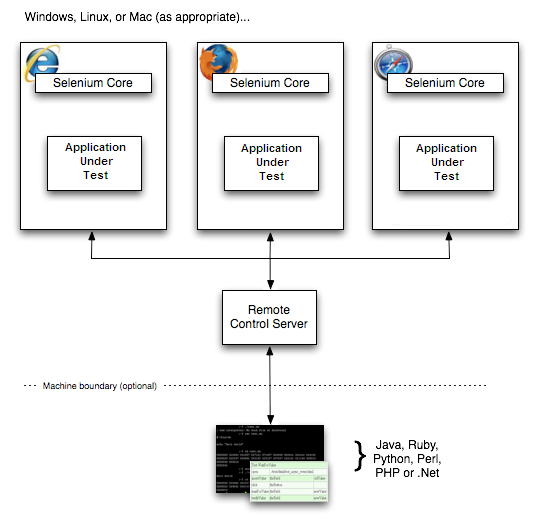
The diagram reveals the client libraries and the Host passing each Selenium command for execution communicate. Subsequently the Selenium command is passed by the host to the browser using Selenium-Core JavaScript commands. The Selenium command is, using its JavaScript interpreter, executed by the browser. This runs verification or the Selenese activity you specified in your test script.
Selenium Server:
Selenium Server receives Selenium commands from your test software, interprets them, and reports back to your application of running those evaluations the outcomes.
Selenium Center is bundled by the RC server and mechanically injects it to the browser. This occurs when your test application opens the browser (using a client library API function). Selenium-Core is a Java Script program, really a collection of JavaScript functions which executes and interprets Selenese commands utilizing the browser's built-in Java Script interpreter.
The Host receives the Selenese commands from your evaluation program using simple HTTP GET/POST requests. This implies you can use any programming language that could send HTTP requests to automate Selenium evaluations on the browser.
Client Libraries:
The client libraries provide the programming support that allows you to run Selenium commands from a software of your layout. There is an alternative client library for each language. A Selenium client library provides a programming interface (API), i.e., a set of features, which run Selenium commands from your own software. within each interface, there is .
The client library takes a Selenese command and passes it to the Selenium Server for processing a certain activity or test against the program under test (AUT). The customer library passes it back to your program and also gets the results of this command. Your program can get the end result and save it right into a program variable and report it as failure or a success, or possibly take corrective actions if it was an unanticipated malfunction.
You simply write an application that runs a set of Selenium commands using a client library API, so to produce a test application. And, optionally, if you curently have a Selenese test script developed in the Selenium IDE, you are able to generate the Selenium RC code. The Selenium IDE can interpret (using its Export menu item) its Selenium commands right into a client-driver's API function calls. Start to see the Selenium-IDE chapter for specifics on exporting RC code from Selenium-IDE.
Installment:
Install is quite a misnomer for Selenium. Selenium has some libraries accessible the programming language of your selection. You could download them from downloads page
Once you have picked a language to work with, you simply need to:
- Install the Selenium RC Server:
- Set up by means of a language particular client driver.
Installing Selenium Server:
The Selenium RC server is simply a Java jar file (selenium-server-standalone-.jar), which doesn't require any particular setup. Extracting the host in the directory that is specified and simply downloading the zip-file is sufficient.
Running Selenium Server:
You need to begin the server, before beginning any tests. Proceed to the directory where the server of Selenium RC is located and run the following from a command line console.
java -jar selenium-server-standalone-<version-number>.jar
java -jar selenium-server-standalone-<version-number>.jar
This can be simplified by creating a batch or shell executable file (.bat on Windows and .sh on Linux) including the command above. Then make a shortcut to that executable on your desktop and simply double click the icon to begin the server.
For the host to to operate you will need Java installed and also the PATH environment variable correctly configured to to operate it in the console. You are able to check by running the following on a console, that you have Java correctly installed.
java -version
java -version
If you get a version number (which has to be 1.5 or later), you're prepared to start using Selenium RC.
Using the Java Client Driver:
- Download Selenium java client driver zip from the downloads page that is SeleniumHQ.
- Extract selenium-java-.jar file
- Open your desirable Java IDE (Eclipse, NetBeans, IntelliJ, Netweaver, etc.)
- Develop a java project.
- Add the selenium-java-.jar files to your job as benchmarks.
- Add to your own project classpath the file selenium-java-.jar.
- From Selenium IDE, export a script into a Java file and include it in your Java project, or write your Selenium evaluation in Java utilizing the selenium-java-client API. The API is introduced later in this chapter. You can both use JUnit, or TestNg to run your evaluation, or it is possible to write your own simple main() program. These concepts are described later in this section.
- Run Selenium server in the console.
- Run your evaluation from your Java IDE or in the command line.
Utilizing the Python Client Driver:
- Install Selenium guidelines.
- Either compose your Selenium evaluation or export a script from Selenium-IDE into a python file.
- Run Selenium server in the console.
- Run your test from your Python IDE or a console.
Using the .NET Customer Driver:
- Download Selenium RC from the SeleniumHQ downloads page.
- Extract the folder.
- Download and install NUnit ( Note: it is possible to use NUnit as your test engine. If you're not familiar yet with NUnit, you may also write a simple main() function to run your tests; however NUnit is very useful as an evaluation engine.).
- Open your desired .Net IDE (Visual Studio, SharpDevelop, MonoDevelop).
- Produce a type library (.dll).
- Write your Selenium evaluation in a .Net language (C#, VB.Net), or export a script from Selenium-IDE to a C# file and copy this code into the class file you only created.
- Write your personal simple main() program or you are able to contain NUnit in your job for running your test. These concepts are described in this chapter.
- Run Selenium server from console
- Run your test either from the IDE, from the NUnit GUI or in the command line.
Utilizing the Ruby Client Driver:
- Should you not yet have RubyGems, install it
- Run stone install selenium-client.
- At the top of your test script, add demand "selenium/client".
- Write your check script utilizing any Ruby test harness (eg Test::Unit, Mini::Test or r spec).
- Run Selenium RC server in the console.
- Execute your evaluation in the same way some other Ruby script would be run by you.